Showing posts with label mom-made. Show all posts

Six Montha-bloga-versary

It's hard to believe that I've actually been blogging for about 6 months now! It feels like so much longer. I've certainly had a lot of fun getting my foot into the door of blogland. I've met some great people and found a LOT of inspiration. I've done things I never believed that I could do all by myself. 
(Okay maybe with a little bit of help.) 
Plus there is something proud about being a blogger. I've had some days where I've felt like I'm wasting my time just typing to have no one reading but then I get those comments on a post and I feel so accomplished! 
(I won't lie I may or may not go back and look at the post over and over and over.)

I have also managed to conquer some HTML and computerized scripty stuff and moved from being a .blogspot.com address to having my own thismessybusiness.com page. Which feels great!

I figured that it would be fun to go through some of the projects that I've accomplished over the last 6 months.

The first huge one that I blogged about was my guest bathroom redo. The place before was a total disaster! And though everyone has seen each of these pictures about a millionzillion times, I figured I could show it again. For old time's sake.


Check out all the details from the wall color to the new counter to painting the fixtures {here}.
The first major building project that we worked on during the last 6 months had to have been the laundry room. I am still immensely proud of that space as a whole. It was soo gross when I first moved in and then it wasn't too bad for the first few years of living there. After I purchased my washer and dryer I decided that the laundry room was ready for an overhaul. Ahhh remember how great my laundry room counter top is?


It's crazy beautiful and different! There is so much more storage space and it's all custom and DIY'd! Very proud laundry room mama right here.

If you missed any of the laundry room re-do check it out here, here, here, and here too.

I even got my own office after an old roommate moved out over the summer! I probably spend more time in there then anywhere else in the entire house. 


Of course I still need to do some work in there such as maybe a new desk or organizational system of some sort. It's a work in progress but I love having that space so much! 

You can see how I painted the stripes (which was terribly time consuming and tiring) here as well as some other office details here.

I've gotten all new furniture for my porch, which looks fantastic! After some elbow grease and DIY action I was able to take some old (but free) chairs and tables and make a really fun space to enjoy with my friends in the summer. It may have taken a lot of spray paint but they really turned out great!


My master bathroom was quite the process to redo! It all started with the drywall having to be repaired after the plumber put a huge hole in it. Then it morphed into painting the walls, the cabinets, the ceiling, replacing the curtains, completely redoing all of the accessories anddd

oh yeah! Remove the doors.
Basically the bathroom got a total overhaul! Check out how great it looks! You can find all the details here !


I also was able to install this fabulous built in the displays all of my necklaces and other jewelry. It's probably the coolest thing in the house considering that it used to be an old mirror covering a huge hole in the wall! Check out how all that went down and how it looks here!


And then just recently within the last few weeks I have started working on my master bedroom... There are so many more things to come that it is just so exciting! I'm so grateful to have such a great group that helps me with all of my crazy projects that I love to do. Having this blog has helped me to keep my sanity when full time work, full time school, and volunteering in classrooms feels like it's taking over my life.

Okay well honestly it is taking over my life but you get the point! Thanks so much to everyone whose a reader or follower on my blog as well as on Facebook, Twitter, and Pinterest! I really appreciate each and every one of you and enjoy each comment and get super excited to see a new follower!

You've all stuck with me through crazy cat stories and awesome bargains!


I love you all!
So stay tuned... if you thought the first 6 months were exciting... it can only get better!




Pinterest Project No. 2

Last week I had a list of 3 projects that I wanted to do from Pinterest. 
I showed you the first one that I did when I made my canvas art out of stickers instead of with wooden letters.


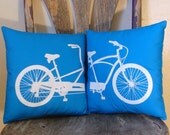
The second project that I had was to make bike pillows!


So my fabulous Mom was gracious enough to whip up some pillows for me (4 in all) out of a discounted canvas fabric. They look fantastic! 


 I had her leave them unstuffed for me so that I could add the bike image on. Adding the bikes was the hard part. I visited the Graphics Fairy and found some vintage bike images that I really liked. I used Picnik to enlarge the image to a size that I thought would fit well onto one of the pillows.

 I printed the images off onto Jolee's Easy Image sheets. I bought mine at Michael's for 9.99 for 10 sheets. A little goes a long way on this one... you can probably fit 2 to 3 images on one sheet if necessary.


It printed off really well! I just ran it through my inkjet printer in my office (Especially considering that I am almost out of ink.)


I cut the image out and tried to get it as close as possible to the outline. It transfers clear but I wanted it to look as seamless as possible. You have to iron the image on with the red stripe facing upwards.


My laundry room counter is so handy! My iron is actually one that my mom gave me when I moved out. I think it's pretty old but it works so well! I have 2 irons... a steam iron and then this regular guy. I keep one in the office for projects and one in the laundry room. 


The package of transfer paper comes with directions on how to apply the image but the trick really was to just get even heat to every part of it.  At first I forgot about the bike seat so I had to go back and fix it.


I think it looks great! And it's totally washable! I love how it turned out! Luckily I have 3 more pillowcases to do so it should be pretty great. I think these could make fun Christmas presents. (Adelle if you are reading this please pretend to be surprised on Christmas.)


Unique and vintage! I just need to stuff it and sew up the top and it will be a great pillow. And it was less then $15 dollars to make all four. Bargain! Usually I can't get one pillow for that cheap. 

Yay! More pillows!


Bathroom Checklist Finale!


Well it has finally come down to it! The ultimate master bathroom finale! 2 months and some change in the making! It's crazy to think I was silly enough to believe I could finish the entire thing in the course of a week before my semester started.

Yeah. Right. But I have learned and find some great solutions!

Let's take a peak at the list from Day 1 back in August
  • paint ceiling and trim
  • paint trim around doors
  • paint towel cabinet white
  • paint vanity cabinets dark brown
  • paint walls grey
  • paint mirror frames
  • create new wall art for above tub
  • add new towel hooks/bars
  • clean up over the potty thing
  • remove foreclosure stickers
  • new accessories
  • DEEP clean and organize
  • line all shelves and drawers
  • figure out new light fixtures (paint the brass ones? invest in new vanity lights??)
  • remove useless doors and replace with luxurious curtains

And here is what the place looked like when I first moved in back in 2008. You can even see my lil 18 year old self in the  mirror! Hi me!


The walls were a weird pinkish beige and the old light fixtures made the room HOT. So hot in fact they had burned spots onto the ceiling. Awesome. The towel rack was in a weird spot  and the accessories were kinda childish. I spent my entire senior year of high school collecting decorations and when I finally moved in I felt like I had none. Crazy how that works.


Here is also the bathroom shower area. It wasn't very pretty for sure. Crappy towel rack, ugly paint, weird door sticker... I didn't enjoy spending time in the bathroom really.


There were several things that had to be done and I soon found that my list from above was getting longer... and longer... and longer. First step though was to have my Dad help me with the wall repair. Which we thought was only going to take a couple hours when really ended up consuming the whole day. 


I was able to mark off everything on my list and get the best bathroom possible. It's classy and comfortable while still maintaining that vintage vibe that I am so in love with. It took a lot longer then I thought it would but it's now a far more attractive and useful space that it makes up for any delay in the time frame. I can't say exactly how much everything cost. I did it over such a span of time that I was able to keep it really budget friendly. Reusing items from around the house, such as picture frames and vases, really helped to keep the costs down also. Probably the most expensive part was the paint which was about $40.00 total. 
(The wall color is Dolphin by Martha Stewart in BHG from Walmart. Semi-gloss of course. I can't find the sample that has the name of the cabinets. But I think it's Eucalyptus something or other from WalMart also. It's dark brown.)


The first part of the renovation that I did was to use this storage about the toilet and make it a more useful space. That was a big part of the project or really any project that I do, to create more storage and a way to actually use the space.  Manufactured homes aren't well known for storage and great layouts. I did get lucky with my because the bathroom is a rather large open space but there was still some aspects of it that seem unusable. 

Decorating this area was a lot of fun. I brought in a bunch of the things I already had so this space was pretty cheap. I used some left over silver spray paint for the TP holder and the over the potty shelving unit was free from an old roommate. You can't see them in this photo but I also added new towel hooks from Hobby Lobby to give it more character. The blue jars I got for free from my Mom's cabinet and then I painted them with some Elmer's glue and food coloring.


Painting this tall cabinet white was also a great idea. It looks really good and takes up a lot less visual space. Which is great! Plus I was able to reorganize it so that I could maximize on the space inside. Remember the goal of the entire reno: storage and function.


I dressed up the space with homemade vintage wall art and a  fantastic gallery wall will vintage images and frames. It really is what makes it seem far more "homey" or personalized without it being too personal. I'm not gonna lie I'm not much for having pictures of my family in the bathroom. I feel like they would be watching me in the bathtub. Weird. 


As you can tell the bathroom cabinets went through a total overhaul. That was about a quart of dark brown paint. It was much easier to cover over the formerly western ranch designs with dark brown then with white. I also spray painted all of the hardware. Which really saved a lot of money. I had to soak them in bleach water to get the grim of 30 years off but I think they turned out rather well really.

Oh! And I added my cute little chair that my brother brought home when we were in middle school.I painted the "12" on it to give it some character and my Mom made that great pillow for me. 


(Ignore the one dark light, Lucy broke the bulb when we were installing it and I just haven't purchased a new one yet) This is probably one of my most favorite parts of the entire room! There is so much that is different on this side of the room. The light fixtures, the built in shelving/necklace storage, the curtains instead of doors, the trim around the mirror is painted. It just all looks so great. 


I decided to take out the doors and replace them with these curtains because the doors were acting as walls more then doors and the space was cramped and blocked off because of the doors. We were constantly moving door stops back and forth.Eliminating the doors eliminated a lot of chaos from our lives. That in itself is a benefit. And don't worry. We still have the doors in the garage in case we sell and someone wants to put them back up. When I redo my bedroom I will probably put curtains on the other side also, just to make it look more finished. No major decisions there though, that would be a totally different post! 


And here's another super proud look at the built in shelf that Justin made me. I used tension rods and shower hooks to make a unique and highly functional necklace holder. I am soooo excited by it! I think it looks so awesome! I kept sending pictures of it to my friends. They love me so they understand my love for home products and decorating and the like. Yay for friends!
Before:


Now the after:


Here's another glimpse of all the different angles of the room. From the entry to the bathroom to each vanity I have touched every surface (except the counter tops) with a paint brush or a new look. Top to bottom the space is absolutely nothing like it was when I bought it back in 2008. 


And just in case you didn't see the huge difference the first time around. Here's another shot. You can see just how drastically everything has changed. Right down to upgrading the hand soap. I am in love with my bathroom. I think it is the best place ever! And I am so grateful to have blog friends that have really helped me with getting through the entire process and having a good time with it!

Here's the comparison:


Please tell me what you think! After 2 months of anxiously waiting to have the entire room completed do you think it was worth the wait?

More Bath Finishes!

I've got more bathroom updates to show you! I know, I know. You can hardly contain yourself As soon as you read that you couldn't quite believe it! Another round of random decorations in the master bathroom??

Oh yes. Yes indeed!

I had this random space above my random floating shelf that was calling out for some sort of decoration. But alas.  Whatever shall we put there?


Well first of all I would like to say that I do have another white shelf that will go below that one. I just have to hang it up. And by "I" of course I mean Justin. He has decided that my attempts to hang anything larger then a nail aren't the best. I think holes add character and surprise behind the picture frame. But whatever right?

So I found this great print from Hobby Lobby yesterday! It's an antique'd sort of subway style image that came already with a mat. It was also only $6.00. Seriously. Half off sales... 

Danger zone.

Anyways ... my print here is awesome!


I love what it says too; "Go confidently in the direction of your dreams, live the life you have imagined." I put it into a frame that I already had. It matches one of the frames that is in the gallery wall so it was able to subtly tie back to the opposite side of the room. 


Anddd here he is on the wall! yay!


The lights were reflecting on the glass but here's a farther away view of it Looks  little bit more finished and it also stays in time with the vintage thing I've been going for. Ahhh. Vintage.


After that I was on a roll! I decided I would decorate around the bathtub!  Because that is the exciting life that I lead. Holla. 

My Mom decided she is going to have a garage sale so I decided I would raid her stuff first to see what I could get at the family discount. Also known as free. 


She had this apothecary jar looking thingy (that was also plastic. Which is awesome.) And I thought that it would be perfect for those weird corners around my tub. So I bought some cheap bath salts from WalMart. I'm allergic to them so I went cheap for decorations sake. 


Cute right? She also had this adorable little wire basket. I rolled up a few towels that were the complimentary colors (read: turquoise and white) in the room and put them inside. It sort of looks a little more spa-like now. Soaker tubs should feel that way I think. 


Here's a pan out of the entire corner of the bathroom. To date the improvements include:
  • Gallery wall
  • New wall color
  • New art
  • New tub accessories
  • New jars for cotton balls, etc.
  • New window coverings
  • New cabinet paint. 
  • New accessories.


Lucy even felt compelled to check out the progress first hand to determine whether or not it was truly acceptable for her feline self.


Too bad her attention span is limited and she became enthralled by the slow drip of the faucet.

Another special Lucy moment for all of my fantastic friends and followers out there.